 WHAT'S UP? WHAT'S UP?
 DOWNLOAD DOWNLOAD
 ONLINE MANUAL ONLINE MANUAL
 Installation Installation
 PIP explained PIP explained
 Profiles > Profiles >
 Posting images Posting images
 Upload history Upload history
 CONTACT US CONTACT US
 ADVERTISING ADVERTISING
 MAKING YOUR MAKING YOUR
 SITE PIP-READY SITE PIP-READY

 PIP-READY SITES PIP-READY SITES
 Pennock's Fiero Pennock's Fiero
 Forum Forum
|
|
Profiles
As mentioned earlier, P.I.P. uses profiles. A profile
is a collection of information, telling P.I.P. exactly where and how to
post your images. You can have seperate profiles for seperate discussion
boards or personal homepages for instance. You'll never have to remember
upload directories, passwords or homepage URLs again. A profile contains
all this information.
|
|
ADDING A PROFILE - AUTOMATIC CONFIGURATION
|
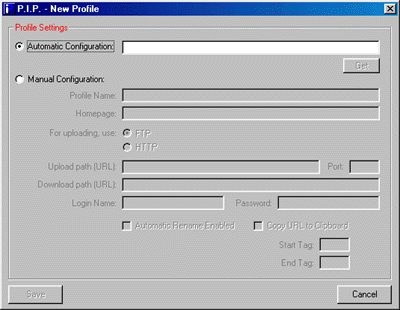
Before you can do anything, you'll need to create a profile first. To
create a profile, click the "New" button
in the main window (or choose "New Profile" from the top menu). After you
have done so, the following Window will appear:
|

There are two ways to create a profile, "Automatic Configuration"
and "Manual Configuration". A PIP-Ready site can supply you
with a special URL, containing all the information P.I.P. needs to create
a profile. A site that's PIP-Ready usually has this button somewhere on
their site:

Clicking this button will take you to a page with the site's URL for the
Automatic Configuration File. Copy the file's location into the
Automatic Configuration field of P.I.P. and click the
"Get" button.
 P.I.P. will immediately download and parse this file. Once the profile has
been created, you can start posting images!
|
|
ADDING A PROFILE - MANUAL CONFIGURATION
|
If a site doesn't support Automatic Configuration, or you want to
use P.I.P. for posting images on your personal website,
you need to manually enter the information from which P.I.P.
can create a profile. To enter the profile's information, first
click the "Manual Configuration"
radio-button to activate the Manual Configuration Fields, and enter
the following information:
- Profile Name
Enter a name to identify the profile. For instance (without the quotes
ofcourse): "My Homepage", "Picture Exchange Forum",
"Amateur Astronomers" or whatever you can think of. The
purpose of this field is merely so you can easily identify it later.
- Homepage
Enter the full URL of the site's homepage. For instance (again
without the quotes): "http://www.amateurastronomers.com" or
"http://www.freewebspace.com/~john/mypage.html". This is the URL
your browser will go to when you click on the large button at the top
in the main P.I.P. screen.
- For uploading, use
Here you can choose between FTP or HTTP. If you normally
need to start your FTP program to upload images, select FTP. If
your website or a discussion forum supports the HTTP PUT method,
you can select HTTP.
- Upload path (URL)
This is the full URL where your images will be posted. If you had
previously selected FTP as the upload method (above), then you
need to specify the physical directory on the webserver, for instance:
ftp://www.freeimages.com/httpd/pub/htdocs/incoming
If you selected HTTP as upload method, this can be a normal
web-address:
http://www.freeimages.com/incoming
Please note that not all websites supports HTTP posting. If you are
uncertain, contact the site's webmaster.
- Download path (URL)
This is the full URL where your images can be downloaded from.
This is always a normal HTTP address, regardless of the chosen
upload method (FTP or HTTP):
http://www.freeimages.com/incoming
- Login Name & Password
Regardless of the upload method used, the server probably requires you to
log in using a username and password before you can post an image. You can
choose to leave these fields empty causing P.I.P. to ask for it everytime
you post a picture.
- Automatic Rename Enabled
When this option is enabled, P.I.P. will first check if the image you
are trying to upload already exists on the destination server. If it does
exist, P.I.P. will automatically choose another name when saving
the image on the remote server. This way, existing images will never
be overwritten. If this option is disabled, images with the same name will
be overwritten.
- Copy URL to Clipboard
When this option is enabled, P.I.P. will copy the URL of the image
to the clipboard. To include this URL inside your forum-message, or an email,
simply paste it by pressing Ctrl-V. You can also specify special leading and
trailing tags to be copied as well. For instance,
Madrona Park's Ultimate Bulletin
Board System makes use of special UBB codes to include images
inside a posting. In Ultimate BBS, the correct format for posting an image
is:
[img]http://www.a_server.com/a_dir/myphoto.jpg[/img]
To automatically include the [img] (start tag) and [/img]
(end tag) tags, enter them in the appropriate fields.
|
|
|


 WHAT'S UP?
 DOWNLOAD
 ONLINE MANUAL
 Installation
 PIP explained
 Profiles >
 Posting images
 Upload history
 CONTACT US
 ADVERTISING
 MAKING YOUR
 SITE PIP-READY
 PIP-READY SITES
 Pennock's Fiero
 Forum
Forum

